1. Why Ingress is Needed
Before Kubernetes v1.1, there was no Ingress. Users relied on Services for:
- Service discovery
- Load balancing (round-robin)
- External exposure (via
LoadBalancertype)
Problems with Service-only approach:
Cost Issue
Each LoadBalancer service requires a static public IP, which cloud providers charge for. Thousands of services = huge cost.
What is Ingress?
Ingress is a Kubernetes resource that:
- Routes external HTTP/HTTPS traffic to services inside the cluster.
- Supports advanced routing (host-based, path-based).
- Enables TLS termination.
Key Components:
- Ingress Resource: Defines routing rules.
- Ingress Controller: Implements those rules using a load balancer (e.g., NGINX, HAProxy, Traefik).
Problems After Migrating to Kubernetes
When organizations migrated to Kubernetes, they encountered two major issues:
Problem #1: Limited Load Balancing Capabilities
Kubernetes Services provide only simple round-robin load balancing through kube-proxy and iptables rules:
- 10 requests → 5 to Pod 1, 5 to Pod 2
- Missing enterprise features like sticky sessions, path-based routing, TLS, ratio-based routing, etc.
What was missing:
- ❌ Enterprise and TLS-based load balancing
- ❌ Sticky sessions
- ❌ Path-based load balancing
- ❌ Host/domain-based load balancing
- ❌ Ratio-based load balancing
- ❌ IP whitelisting/blacklisting
- ❌ WAF capabilities
- ❌ Advanced security features
Problem #2: Cost of LoadBalancer Service Type
When using type: LoadBalancer services:
- Each service gets a static public IP address
- Cloud providers charge for each static IP
- For 1,000 microservices = 1,000 IP addresses = very expensive
In the VM world, organizations used one load balancer for all applications, configuring routing rules internally (e.g., /app1 → Application 1, /app2 → Application 2).
Note: OpenShift implemented a similar feature called “OpenShift Routes” before Kubernetes Ingress was standardized.
Ingress Architecture
How It Works
┌─────────────────────────────────────────────────────┐
│                  Kubernetes Cluster                 │
│                                                     │
│  ┌──────────────┐         ┌─────────────────────┐  │
│  │   Ingress    │         │  Ingress Controller │  │
│  │   Resource   │────────▶│   (e.g., NGINX)     │  │
│  │   (YAML)     │         │   (Pod/Deployment)  │  │
│  └──────────────┘         └─────────────────────┘  │
│                                     │               │
│                                     ▼               │
│                           ┌──────────────────┐      │
│                           │    Services      │      │
│                           └──────────────────┘      │
│                                     │               │
│                                     ▼               │
│                           ┌──────────────────┐      │
│                           │      Pods        │      │
│                           └──────────────────┘      │
└─────────────────────────────────────────────────────┘
Workflow
- User creates Ingress Resource – Defines routing rules in YAML
- Ingress Controller watches – Continuously monitors for Ingress resources
- Controller configures load balancer – Updates its configuration based on Ingress rules
- Traffic routing – Routes external traffic to appropriate services/pods
Analogy:
- Ingress Resource = Traffic rules you define
- Ingress Controller = Traffic cop that enforces those rules
Just like:
kubeletwatches for Pod resources and deploys themkube-proxywatches for Service resources and updates iptables
The Ingress Controller watches for Ingress resources and configures routing.
What is Ingress?
Ingress is a Kubernetes resource that:
- Routes external HTTP/HTTPS traffic to services inside the cluster.
- Supports advanced routing (host-based, path-based).
- Enables TLS termination.
Key Components:
- Ingress Resource: Defines routing rules.
- Ingress Controller: Implements those rules using a load balancer (e.g., NGINX, HAProxy, Traefik).
How Ingress Works
Ingress Controller acts as the entry point for external traffic.
You create an Ingress resource with routing rules.
An Ingress Controller (e.g., NGINX) watches for Ingress resources and updates its configuration.
Why Use Ingress Over LoadBalancer?
You create an Ingress resource with routing rules.
An Ingress Controller (e.g., NGINX) watches for Ingress resources and updates its configuration.
Limited Load Balancing Features
Services only support basic round-robin. Missing enterprise features like:
Sticky sessions
Path-based routing
Host-based routing
TLS termination
Whitelisting/blacklisting
Ratio-based load balancing
For any ecommerce website there will be more then 200 services
Problems with LoadBalancer services:
- 💰 Cost: Each service needs a separate external IP
- 🔀 Routing: No advanced routing capabilities
- 🛡️ Features: No WAF, SSL termination, path-based routing
Client Request
↓
[Ingress Controller] ← Watches Ingress Resources
↓
[Load Balancer] ← Configured by Controller
↓
[Services] → [Pods]
Components:
- Ingress Resource: YAML manifest defining routing rules
- Ingress Controller: Watches Ingress resources and configures load balancer
- Load Balancer: Routes traffic based on rules (nginx, HAProxy, etc.)
Ingress Controllers
Why Ingress Controller required
its just load balancer but develop by different companies.
Because Kubernetes cant create different implementation for each company to handle ingress..company means like NGINX, Traefik ..so they have written just ingress and then which controller it use written by company.
We just need to add controller class in our ingress file then it start using particular controller.. so then controller choose how to implement particular load balancing.
INGRESS IS OF NO USE WITHOUT ingress controller.. we can use one ingress controller and create any type of ingress.
Popular Ingress Controllers
- NGINX Ingress Controller (most common)
- HAProxy
- Traefik
- Citrix ADC
- F5 BIG-IP
- Ambassador
- Istio/Envoy (Service Mesh)
- 30+ officially supported controllers
How Ingress Controllers Work
Example: NGINX Ingress Controller
- Install NGINX Ingress Controller:
helm install nginx-ingress ingress-nginx/ingress-nginx- Controller watches for Ingress resources
- Updates
nginx.confwith routing rules - NGINX pod handles traffic routing
Configuration Example:
Basic Ingress Resource
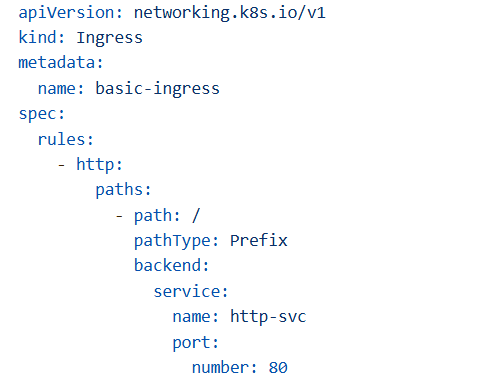
Key Fields:
apiVersion: networking.k8s.io/v1(previouslyextensions/v1beta1, deprecated in 1.22+)kind: Ingressspec.rules: Define routing rules
Host-Based Routing
Use Case: Route traffic based on domain name
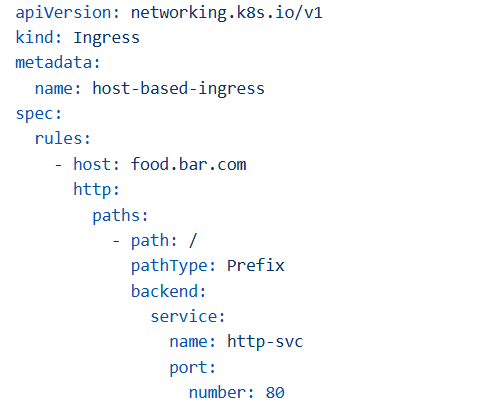
Testing:
# Without host header (fails)
curl http://<INGRESS_IP>
# Output: 404 Not Found

# With host header (succeeds)
curl -H "Host: food.bar.com" http://<INGRESS_IP>
# Output: Success response from http-svc
Path-Based Routing
Use Case: Route to different services based on URL path
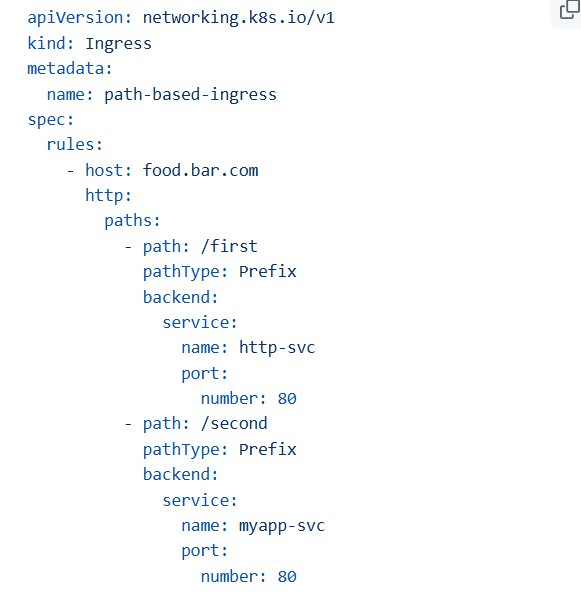
Testing:
# Route to http-svc
curl -H "Host: food.bar.com" http://<INGRESS_IP>/first
# Output: Response from http-svc

# Route to myapp-svc
curl -H "Host: food.bar.com" http://<INGRESS_IP>/second
# Output: Response from myapp-svc
what is Ingress Classes
Ingress Classes in Kubernetes define which controller should implement a given Ingress resource. Think of them as a way to tell Kubernetes: “This Ingress should be handled by this specific ingress controller.”
Why do we need Ingress Classes?
- In a cluster, you can have multiple ingress controllers (e.g., NGINX, Traefik, AWS ALB).
- Each controller watches for Ingress resources with its class name.
- This prevents conflicts and allows different routing strategies for different apps.
How It Works
- An Ingress resource has: YAMLspec:
ingressClassName: nginx-external
spec:
  ingressClassName: nginx-external
The controller (e.g., NGINX) registers itself with an IngressClass object
apiVersion: networking.k8s.io/v1
kind: IngressClass
metadata:
  name: nginx-external
spec:
  controller: k8s.io/ingress-nginx
When Kubernetes sees an Ingress with ingressClassName: nginx-external, it routes traffic using the NGINX ingress controller.
Why Ingress Classes?
- Multiple teams using different controllers
- Different controllers for different purposes (internal vs external)
- Mixing controller types (NGINX + HAProxy)
Basic Authentication
Use Case: Restrict access to authorized users only
apiVersion: networking.k8s.io/v1
kind: Ingress
metadata:
name: auth-ingress
annotations:
nginx.ingress.kubernetes.io/auth-type: basic
nginx.ingress.kubernetes.io/auth-secret: basic-auth
nginx.ingress.kubernetes.io/auth-realm: ‘Authentication Required’
spec:
rules:
– host: secure.bar.com
http:
paths:
– path: /
pathType: Prefix
backend:
service:
name: app-service
port:
number: 80
How Basic Auth Works in NGINX Ingress
auth-type: basic→ Enables HTTP Basic Authentication.auth-secret: basic-auth→ Refers to a Kubernetes Secret that stores username/password in htpasswd format.auth-realm→ Message shown in the browser login prompt.
If the user does not provide valid credentials, NGINX returns 401 Unauthorized.
Steps to Restrict Access
- Create the Secret with Credentials
htpasswd -c auth basic-user
# Enter password when prompted
kubectl create secret generic basic-auth --from-file=auth- This creates a secret named
basic-authwith the fileauthcontainingusername:hashed-password.
Apply the Ingress
- Your Ingress references this secret, so only users with valid credentials can access the app.
Additional Hardening
- Use HTTPS: Basic Auth sends credentials in base64; without TLS, they can be intercepted.
- IP Whitelisting (optional)
nginx.ingress.kubernetes.io/whitelist-source-range: "192.168.1.0/24"Only allow specific IP ranges.
Rate Limiting
nginx.ingress.kubernetes.io/limit-connections: “10”
nginx.ingress.kubernetes.io/limit-rpm: “100”
TLS/SSL with Ingress
SSL/TLS Termination Types
1. SSL Passthrough
How it works:
Code
[Client] --HTTPS--> [Load Balancer] --HTTPS--> [Server]
         (encrypted)    (passthrough)    (encrypted)
Characteristics:
- ✅ End-to-end encryption
- ❌ Load balancer can’t inspect traffic
- ❌ No WAF, path routing, or cookie management
- ❌ Only Layer 4 (TCP) load balancing
- ❌ Server handles all decryption (high load)
- ⚠️ Vulnerable to attacks (LB can’t detect malware)
Configuration:
YAML
apiVersion: networking.k8s.io/v1
kind: Ingress
metadata:
  name: ssl-passthrough
  annotations:
    nginx.ingress.kubernetes.io/ssl-passthrough: "true"
spec:
  rules:
    - host: secure.example.com
      http:
        paths:
          - path: /
            pathType: Prefix
            backend:
              service:
                name: secure-service
                port:
                  number: 443
When to use:
- Regulatory compliance requires end-to-end encryption
- Don’t trust the load balancer layer
- Very specific security requirements
2. SSL Edge Termination (Offloading)
How it works:
Code
[Client] --HTTPS--> [Load Balancer] --HTTP--> [Server]
         (encrypted)   (decrypt)      (plain)
Characteristics:
- ✅ Fastest performance (server doesn’t decrypt)
- ✅ Load balancer can inspect traffic
- ✅ WAF, routing, caching available
- ❌ Internal traffic is unencrypted
- ⚠️ Vulnerable to man-in-the-middle attacks internally
Configuration:
YAML
apiVersion: networking.k8s.io/v1
kind: Ingress
metadata:
  name: ssl-edge
spec:
  tls:
    - hosts:
        - app.example.com
      secretName: tls-secret
  rules:
    - host: app.example.com
      http:
        paths:
          - path: /
            pathType: Prefix
            backend:
              service:
                name: app-service
                port:
                  number: 80  # HTTP backend
Create TLS Secret:
bash
kubectl create secret tls tls-secret \
  --cert=path/to/cert.crt \
  --key=path/to/cert.key
When to use:
- Performance is critical
- Internal network is trusted
- Security is not the top priority
- High traffic applications
3. SSL Re-encrypt (Bridging) – RECOMMENDED
How it works:
Code
[Client] --HTTPS--> [Load Balancer] --HTTPS--> [Server]
         (encrypted)   (decrypt +      (re-encrypted)
                       re-encrypt)
Characteristics:
- ✅ Secure end-to-end
- ✅ Load balancer can inspect traffic
- ✅ WAF, routing, security features available
- ✅ Detects malware and malicious requests
- ⚠️ Slightly slower (double encryption)
- ✅ Best balance of security and functionality
Configuration:
YAML
apiVersion: networking.k8s.io/v1
kind: Ingress
metadata:
  name: ssl-reencrypt
  annotations:
    nginx.ingress.kubernetes.io/backend-protocol: "HTTPS"
spec:
  tls:
    - hosts:
        - app.example.com
      secretName: frontend-tls-secret
  rules:
    - host: app.example.com
      http:
        paths:
          - path: /
            pathType: Prefix
            backend:
              service:
                name: app-service
                port:
                  number: 443  # HTTPS backend
When to use:
- Security is important
- Need load balancer features (WAF, routing)
- Production environments
- Most common choice
Practical Examples
Example 1: Multi-Service Application
apiVersion: networking.k8s.io/v1
kind: Ingress
metadata:
name: multi-service-ingress
annotations:
nginx.ingress.kubernetes.io/rewrite-target: /
spec:
rules:
– host: myapp.example.com
http:
paths:
# Frontend
– path: /
pathType: Prefix
backend:
service:
name: frontend-service
port:
number: 80
# API
– path: /api
pathType: Prefix
backend:
service:
name: api-service
port:
number: 8080
# Admin
– path: /admin
pathType: Prefix
backend:
service:
name: admin-service
port:
number: 3000
This Ingress manifest is an example of path-based routing in Kubernetes using the NGINX Ingress Controller. Let’s break it down:
✅ What It Does
- Ingress resource: Defines external access to multiple services inside your cluster.
- Host:
myapp.example.com→ All rules apply to this domain. - Annotation:
nginx.ingress.kubernetes.io/rewrite-target: /This tells NGINX to strip the matched path and forward requests to the backend starting at /.
✅ Routing Logic
Under spec.rules:
- Path
/→ frontend-service (port 80)- Requests like
https://myapp.example.com/go to the frontend.
- Requests like
- Path
/api→ api-service (port 8080)- Requests like
https://myapp.example.com/apigo to the API service.
- Requests like
- Path
/admin→ admin-service (port 3000)- Requests like
https://myapp.example.com/admingo to the admin dashboard.
- Requests like
✅ Why Use rewrite-target: /?
Without this annotation:
- A request to
/api/userswould be sent to the backend as/api/users. With rewrite: - It becomes
/users(because the prefix/apiis stripped). This is useful if your backend expects root paths.
✅ Benefits
- Single domain for multiple services.
- No need for separate LoadBalancers.
- Easy to manage routing rules.
Example 2: Canary Deployment
Stable version
apiVersion: networking.k8s.io/v1
kind: Ingress
metadata:
name: app-stable
spec:
rules:
– host: app.example.com
http:
paths:
– path: /
pathType: Prefix
backend:
service:
name: app-v1
port:
number: 80
Canary version (10% traffic)
apiVersion: networking.k8s.io/v1
kind: Ingress
metadata:
name: app-canary
annotations:
nginx.ingress.kubernetes.io/canary: “true”
nginx.ingress.kubernetes.io/canary-weight: “10”
spec:
rules:
– host: app.example.com
http:
paths:
– path: /
pathType: Prefix
backend:
service:
name: app-v2
port:
number: 80
You have two Ingress resources for the same host (app.example.com):
- Stable Version
- Routes all traffic to
app-v1(your stable version).
Canary Version
-
nginx.ingress.kubernetes.io/canary: "true"→ Marks this Ingress as a canary.nginx.ingress.kubernetes.io/canary-weight: "10"→ Sends 10% of traffic toapp-v2(your new version).
✅ Why Use This?
- Canary deployments allow you to gradually roll out a new version without impacting all users.
- If something goes wrong, you can easily revert by removing the canary Ingress.
✅ How It Works
- Both Ingresses share the same host (
app.example.com). - NGINX Ingress Controller uses the annotations to split traffic:
- 90% →
app-v1(stable) - 10% →
app-v2(canary)
- 90% →
Example 3: Rate Limiting;
apiVersion: networking.k8s.io/v1
kind: Ingress
metadata:
name: rate-limited-ingress
annotations:
nginx.ingress.kubernetes.io/limit-rps: “10” # 10 requests per second
nginx.ingress.kubernetes.io/limit-connections: “5”
spec:
rules:
– host: api.example.com
http:
paths:
– path: /
pathType: Prefix
backend:
service:
name: api-service
port:
number: 80
This Ingress manifest is an example of rate limiting using NGINX Ingress Controller annotations. Here’s what it means:
✅ Purpose
To protect your API from abuse or overload by limiting:
- Requests per second (RPS) per client.
- Concurrent connections per client.
✅ Annotations Explained
nginx.ingress.kubernetes.io/limit-rps: “10”
Limits each client to 10 requests per second. If a client sends more than 10 requests in one second, extra requests are rejected with HTTP 503 (Service Unavailable).
nginx.ingress.kubernetes.io/limit-connections: “5”
Limits each client to 5 simultaneous connections. If a client tries to open more than 5 connections at once, extra connections are blocked.
✅ Why Use This?
- Prevent DDoS attacks or accidental overload.
- Ensure fair usage among clients.
- Protect backend services from excessive traffic.
✅ Important Notes
- Works only with NGINX Ingress Controller.
- Rate limiting is per client IP by default.
- Combine with:
- Authentication (Basic Auth, OAuth).
- IP Whitelisting for extra security.
Leave a Reply