Step 1: Understand the Application Requirements
Before provisioning infrastructure, gather:
- Number of services (APIs, frontends, background jobs)
- Resource needs (CPU, memory)
Traffic expectations
Database and storage dependencies
Secrets and config management
✅ Tools:
- dotnet-counters: Real-time performance metrics
- dotnet-monitor: Exposes metrics via HTTP
- Visual Studio Diagnostic Tools
Look for:
- CPU usage
- Memory allocation
- GC activity
- Thread count
📌 This helps you estimate pod resource requests/limits.
Step 2: Plan AKS Infrastructure
Decide:
- Region: Closest to users or data
- Node size: Based on app resource needs (e.g., Standard_DS2_v2)
- Node count: Start with 2–3 nodes; use autoscaling later
- Networking:
- Azure CNI for advanced networking
- Private cluster if security is a concern
- Ingress controller: NGINX or Azure Application Gateway
- Monitoring: Enable Azure Monitor and Log Analytics
RegistryUse – Azure Container Registry (ACR)
We need to create separate node for system and user pods
Why Separate Node Pools Matter
👶 Layman’s Explanation:
Think of your AKS cluster like a building with two floors:
- The ground floor is for security staff and infrastructure (system node pool).
- The upper floor is for employees doing actual work (user node pool).
You don’t want employees messing with the security systems, and you don’t want security staff using workstations meant for developers.
💻 Technical Explanation:
- System Node Pool runs critical Kubernetes components (e.g., kube-proxy, CoreDNS, monitoring agents).
- User Node Pool runs your application Pods — web apps, APIs, databases, etc.
- This separation improves:
- Security: System Pods are isolated.
- Stability: User workloads don’t overload system resources.
- Scalability: You can autoscale user nodes independently.
1. Can All Nodes Communicate with Each Other in AKS?
👶 Layman’s Explanation:
Yes — think of all nodes in AKS like rooms in the same building. They’re connected by internal hallways, so they can talk to each other easily.
💻 Technical Explanation:
- In AKS, all nodes (system and user) are part of the same virtual network (VNet).
- Kubernetes uses overlay networking (via Azure CNI or Kubenet) to allow Pods on different nodes to communicate.
- Pod-to-Pod communication across nodes is seamless unless restricted by a NetworkPolicy.
2. How Do You Decide Which Node Runs System vs. User Pods?
👶 Layman’s Explanation:
It’s like assigning rooms in a hotel: VIP guests (system Pods) go to the executive floor, and regular guests (user Pods) go to standard rooms.
💻 Technical Explanation:
Kubernetes uses taints and tolerations to control Pod placement:
User Node Pool
- No taints by default, so application Pods are scheduled here.
- You can customize scheduling using:
- Node selectors
- Affinity rules
- Custom taints/tolerations
Step 3: Provision AKS Cluster
Use Azure CLI or Terraform. Example with Azure CLI:
az aks create \
–resource-group myResourceGroup \
–name myAKSCluster \
–node-count 3 \
–enable-addons monitoring \
–generate-ssh-keys \
–network-plugin azure
Step 4: Set Up Container Registry
Use Azure Container Registry (ACR) or GitHub Container Registry.
az acr create –resource-group myResourceGroup –name myACR –sku Basic
az aks update –name myAKSCluster –resource-group myResourceGroup –attach-acr myACR
Above command
AKS (Azure Kubernetes Service) needs access to ACR (Azure Container Registry) to pull container images. By default, AKS doesn’t have permission to access ACR unless you explicitly attach it. This command:
- Updates the AKS cluster.
- Grants the AKS-managed identity pull access to the specified ACR.
- Ensures seamless deployment of container images stored in ACR.
Step 5: Containerize .NET Application
Create a Dockerfile for your .NET app:
FROM mcr.microsoft.com/dotnet/aspnet:6.0 AS base
WORKDIR /app
EXPOSE 80
FROM mcr.microsoft.com/dotnet/sdk:6.0 AS build
WORKDIR /src
COPY . .
RUN dotnet publish -c Release -o /app/publish
FROM base AS final
WORKDIR /app
COPY –from=build /app/publish .
ENTRYPOINT [“dotnet”, “YourApp.dll”]
Build and push to ACR:
docker build -t myacr.azurecr.io/yourapp:v1 .
docker push myacr.azurecr.io/yourapp:v1
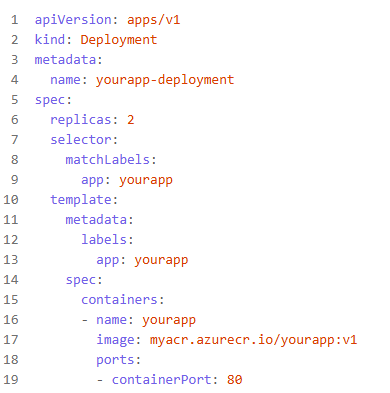
Step 6: Create Kubernetes Manifests
You’ll need:
- Deployment: Defines pods and container specs
- Service: Exposes the app internally or externally
- Ingress: For routing HTTP traffic
- ConfigMap/Secret: For environment variables and secrets
Example deployment.yaml:
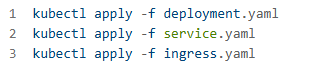
Step 7: Apply Manifests
Use kubectl to apply:
Step 8: Set Up CI/CD
Use GitHub Actions or Azure DevOps Pipelines:
- Build and push Docker image
- Deploy to AKS using
kubectl
Step 9: Monitor and Scale
- Use Horizontal Pod Autoscaler
- Enable Azure Monitor
- Set up alerts and dashboards
Step 10: Secure the Cluster
- Use RBAC for access control
- Store secrets in Azure Key Vault
- Enable network policies and private endpoints
Step-by-Step: Enable AKS to Access Azure Key Vault
Step 1: Create a User Assigned Managed Identity (UAMI)
az identity create –name aks-uami –resource-group myResourceGroup
This returns:
clientIdprincipalIdresourceId
Save these for later.
Step 2: Assign Access to Key Vault
Give the UAMI Key Vault Secrets User role:
az keyvault set-policy \
–name myKeyVault \
–object-id \
–secret-permissions get list
Replace <principalId> with the one from Step 1.
Step 3: Attach UAMI to AKS Cluster
az aks update \
–name myAKSCluster \
–resource-group myResourceGroup \
–assign-identity
Replace <resourceId> with the UAMI resource ID from Step 1.
✅ Step 4: Use UAMI in Workloads (Pod Level)
To allow a pod to use the identity, use Azure Workload Identity or AAD Pod Identity (AAD Pod Identity is deprecated, so use Workload Identity).
🔸 Install Azure Workload Identity:
az aks enable-addons \
–addons azure-workload-identity \
–name myAKSCluster \
–resource-group myResourceGroup
Annotate your Kubernetes Service Account:
apiVersion: v1
kind: ServiceAccount
metadata:
name: myapp-sa
annotations:
azure.workload.identity/client-id: <clientId>
✅ Step 5: Access Key Vault from .NET App
Use the Azure SDK in your app:
var client = new SecretClient(new Uri(“https://myKeyVault.vault.azure.net/”), new DefaultAzureCredential());
KeyVaultSecret secret = await client.GetSecretAsync(“DbConnectionString”);
DefaultAzureCredential will use the UAMI automatically inside AKS.
Leave a Reply